In a nutshell
- 🌱 Light exclusion made simple: Cardboard blocks sunlight while remaining permeable, smothering weeds and encouraging earthworms for healthier, living soil.
- 📦 Right materials matter: Use plain, uncoated corrugated cardboard; remove tape and staples, avoid glossy or waxed boxes, and overlap seams by 10–15 cm.
- 🧰 Step-by-step deployment: Mow low, pre-wet soil and sheets, lay one solid layer (two for tough patches), then top with 5–8 cm of organic mulch and keep stems mulch-free.
- 🔁 Low maintenance, smart tweaks: Patch gaps, manage slugs, and mitigate nitrogen drawdown with compost; proper installation delivers season-long suppression.
- 🌍 Greener and more resilient: Reuses waste, cuts plastic and herbicides, conserves moisture, and builds regenerative soil structure suited to UK weather swings.
Gardeners spend too many weekends on their knees, tugging at roots that seem to regenerate overnight. There’s a quieter way. A sheet of humble cardboard, combined with a smart mulch, can halt unwanted growth and build richer soil at the same time. Think of it as a breathable blanket: it blocks light, slows evaporation, and feeds the earth as it breaks down. The technique is simple, inexpensive, and forgiving. When done properly, a single afternoon’s work can suppress weeds for the whole growing season. Here’s how the cardboard trick works, how to choose the right material, and how to lay it so your beds stay clean, productive, and beautifully low-maintenance.
How the Cardboard Barrier Works
At its core, the method relies on light exclusion. Weeds can’t photosynthesise without sunlight; remove the light and most give up. Cardboard forms an opaque barrier that smothers emerging shoots while remaining gently permeable to water and air. Soil stays moist, but it can still breathe. Earthworms love the dark, cool conditions and quickly colonise the area, dragging fibres down and turning them into castings. The result is a quieter, kinder weed control that teams with life rather than fighting it.
Because cardboard is carbon‑rich, it breaks down over months, not days. That’s ideal: long enough to hold the line through peak growth, short enough to integrate into the soil food web. Place a mulch on top—wood chips, compost, leaf mould—and you get a two-layer defence. The mulch protects the cardboard from UV and wind, while the cardboard blocks light beneath. Together, they form a stable cover that also moderates temperature swings during hot spells and cool nights.
Not every weed will surrender at once. Deep-rooted perennials such as bindweed or couch grass may probe for gaps. Overlap sheets well and maintain a decent mulch depth to stop opportunists. If you’re reclaiming a rough patch, plan on a slightly thicker barrier and monitor the edges. Small diligence at the start saves hours later.
Choosing and Preparing the Right Cardboard
Start with plain, uncoated corrugated cardboard—the sturdy kind from delivery boxes. Avoid anything glossy, waxed, or heavily dyed. Remove plastic tape and labels meticulously; they do not decompose and will litter the bed later. A quick soak (a minute or two with a hose) makes sheets pliable and helps them settle into the soil’s contours. Pre-wetting also encourages an immediate bond with the ground, reducing air pockets where weeds might sneak through.
| Cardboard Type | Safe to Use? | Notes |
|---|---|---|
| Plain corrugated brown | Yes | Best choice; remove all tape and staples. |
| Lightly printed shipping boxes | Generally | Small black text is fine; avoid heavy colour blocks. |
| Glossy or laminated | No | Coatings shed microplastics; resists decomposition. |
| Waxed produce boxes | No | Designed to repel water; blocks permeability. |
In the UK, supermarkets and appliance shops often have piles of spare boxes—ask at the service desk. Choose sheets large enough to span beds with minimal joins. If you must patch, overlap edges by at least 10–15 cm. Keep a knife or tough scissors handy to shape pieces around shrubs and posts. Quality prep—clean edges, no plastic, good overlaps—determines how effectively the barrier prevents light leaks throughout the season.
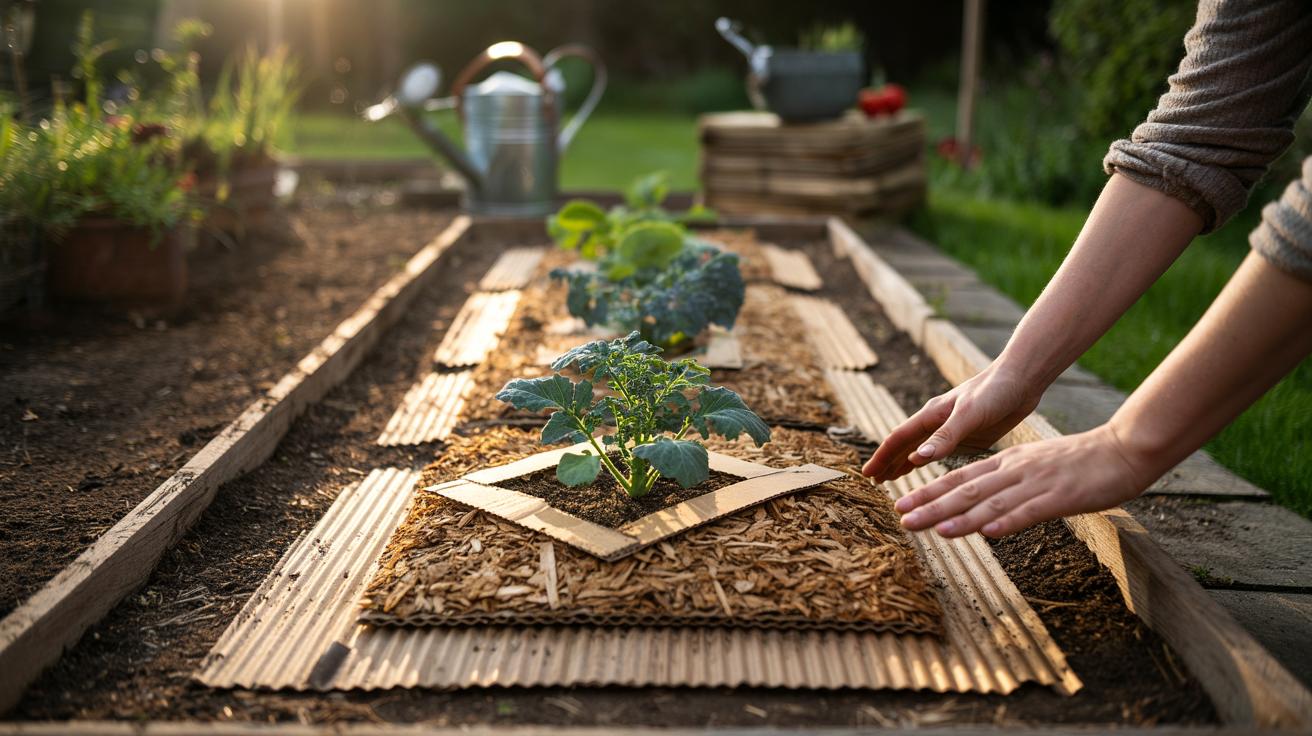
Step-by-Step: Laying Cardboard Mulch for the Season
Begin by cutting existing growth low. A strim or close mower pass is perfect. Water the soil well if it’s dry; damp ground helps the cardboard sit snugly. Lay the first sheet along one edge of the bed and work across, pushing pieces under plant canopies with a trowel. Overlap every seam generously—think roof tiles, not parquet. Aim for one robust layer of cardboard, or two in problem spots.
Once down, soak the surface. You want it heavy and conforming. Now add your top layer: 5–8 cm of organic mulch. Wood chips last longest for paths and around shrubs. Compost or leaf mould suits vegetables and perennials that prefer a quicker feed. Keep a mulch-free collar around trunks and stems to prevent rot. Where you plan to plant, cut a cross, peel back the flaps, and tuck the cardboard snugly around the stem after planting. This keeps the barrier continuous around each new arrival.
Timing matters. Spring installation intercepts that first weed flush. Autumn works brilliantly for bed conversions and lets winter weather and worms do half the work before spring. On slopes, pin corners with biodegradable pegs or tuck edges under a lip of soil. Consistency is key: sealed seams, proper depth, and adequate watering on day one create a season-long shield with minimal tinkering.
Maintenance, Timing, and Environmental Benefits
Day to day, care is light. Scan for gaps after wind or heavy rain. Top up mulch where you can see cardboard peeking through—exposed patches degrade faster and invite opportunistic weeds. If a tough perennial punches through, cut off the light again: slide a fresh patch beneath the mulch and overlap well. Slugs can shelter in lush, damp covers; a coarser chip on ornamentals and regular scouting in vegetable beds keeps numbers in check.
Because cardboard is carbon-rich, some gardeners worry about nitrogen drawdown. Under a proper mulch, and with living soil, this is usually a non-issue. If you’re planting heavy feeders, slip a thin layer of mature compost under the mulch or water in an organic feed at planting. Healthy, covered soil loses less moisture and holds nutrients where roots can use them. That means fewer waterings during dry spells and sturdier plants in heatwaves.
The environmental gains are compelling. You’re reusing a waste stream, cutting plastic weed membranes, and reducing reliance on herbicides. Over time, covered beds build crumbly structure, better infiltration, and a richer microbiome. In a changing climate—wetter winters, drier summers in many parts of the UK—this resilience matters. Cardboard mulching is not just a shortcut to a tidier plot; it’s a small, scalable act of regenerative gardening that pays back season after season.
The cardboard trick is disarmingly simple: block the light, feed the soil, save your back. Done with care—clean materials, firm overlaps, a generous mulch—it turns scrappy corners and weedy paths into low-maintenance, productive ground. You’ll spend less time yanking and more time harvesting or just enjoying the view. One afternoon can change the rhythm of your entire season. Where in your garden would a breathable, biodegradable weed barrier make the biggest difference, and what would you plant once the weeds are out of your way?
Did you like it?4.6/5 (28)