In a nutshell
- 🧹 Pros swear by a £2 toothbrush‑style grout brush with stiff nylon bristles; its narrow head delivers precision agitation that outperforms harsh chemicals on grout lines.
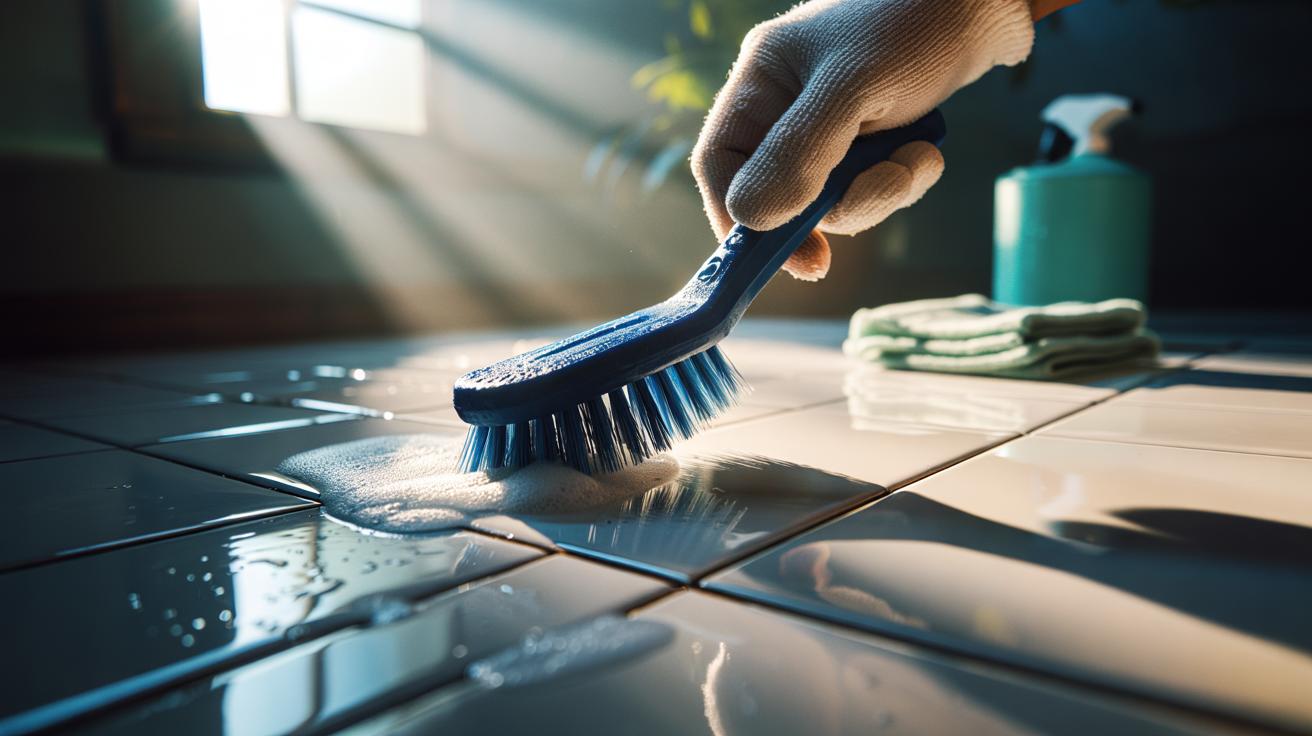
- 🔧 Pro method: dry prep, apply mild chemistry, allow 3–5 minutes dwell, scrub at ~45° in short cross-hatch strokes, wipe slurry, rinse, and dry thoroughly to prevent return marks.
- 🧪 Pair smartly: use pH‑neutral detergent for everyday soil, alkaline degreaser for kitchen grease, and oxygen bleach for bathroom stains; avoid strong acids on cement grout and vinegar on natural stone.
- ⚠️ Safety and care: ventilate, wear gloves, spot-test, stop if grout is crumbling, and replace the brush when bristles flare; precision, not force, protects tiles.
- 🛡️ Keep results: adopt a quick weekly pass in splash zones and seal porous grout annually to slow soiling and maintain crisp, spotless lines.
Ask any veteran cleaner for their secret to immaculate tiles and they’ll quietly pull a compact brush from their caddy. Not a gadget. Not a pricey potion. A simple, stiff-bristled detail brush that costs around £2. Its narrow head slices into porous grout, lifting the film of soap, grease, and mildew that mops simply glaze over. The magic isn’t mysterious; it’s mechanical. Tiny bristles, lots of contact, consistent pressure. It’s the brush, not bleach, that does most of the cleaning. Whether you rent, own, or manage properties, this pocket tool turns grim grout into a believable before-and-after, quickly. It belongs in every home kit—right beside the plunger and the microfibre cloth.
What Is the £2 Grout Tool?
The workhorse is a toothbrush-style grout brush with stiff nylon bristles and an angled neck. If you’ve seen a detailing brush for bikes or trainers, you’re close. In UK discount shops and supermarket cleaning aisles, versions sell for £1–£2 and last months with light use. The narrow profile targets the concave groove between tiles, where dirt settles and mildew thrives. Unlike big scrubbers, it doesn’t smear grime; it cuts lines. Precision beats power on grout. Nylon is hard enough to agitate cementitious grout but forgiving on glazed tile, so you get abrasion where you need it and protection where you don’t.
Professionals prefer it because it plays well with every chemistry in their kit. Alkaline degreasers in kitchens. Oxygen-based brighteners in showers. Mild detergent for delicate stone. The brush drives solutions in, then drags soiling out. It’s cheap, modular, and hygienic—colour code brushes by room to prevent cross-contamination. The handle’s angle matters too; a slight kink lets you scrub without scraping knuckles along tile edges. Short, firm strokes across the line—never along it—lift soil fastest. It’s simple, almost boring, and devastatingly effective.
How to Use It Like a Pro
Start dry. Vacuum or sweep to remove grit; sand under bristles will scratch. Mist the grout with warm water to soften residue. Mix a basic paste: two parts bicarbonate of soda to one part washing-up liquid, or use a ready-made pH-neutral floor cleaner for sealed stone. Spread a thin bead along the grout; no need to drown it. Give chemistry three to five minutes of dwell time. That pause lets surfactants break the bond between soil and grout.
Now scrub. Hold the £2 brush at 45 degrees and work in short cross-hatch strokes. Press enough to flex the bristles, not splay them flat. Tackle one square metre at a time. In showers with mould staining, swap to an oxygen bleach solution (sodium percarbonate in warm water). For kitchens, a diluted alkaline degreaser slices through film quickly. Avoid strong acids on cement grout and avoid vinegar on natural stone—etching is forever. Wipe slurry with a microfibre cloth, rinse with clean water, then dry. Drying is the overlooked step that prevents shadowy lines returning. Finish by sealing porous grout annually to slow future soiling.
What To Pair With the Brush
The £2 brush is the engine; products are the fuel. Choose by soil type and surface. In most homes, three helpers cover nearly everything: a mild detergent for general build-up, an alkaline degreaser for oily kitchens, and an oxygen-based brightener for bathroom discoloration. Professionals layer gently—lightest chemistry first, stronger only if needed. Why? It protects finishes and saves money. Think targeted solutions, not kitchen-sink cocktails. Ventilate well, wear gloves, and always spot-test in a hidden corner. If your grout is crumbling or sandy to the touch, stop and repair before scrubbing; abrasion will make damage worse.
| Product | Best For | Safe On | Avoid On |
|---|---|---|---|
| pH-neutral detergent | Everyday soap scum, light dirt | Ceramic, porcelain, sealed stone | Unsealed limestone (test first) |
| Alkaline degreaser | Kitchen grease films | Glazed tile, epoxy grout | Waxed surfaces, wood trims |
| Oxygen bleach | Mould stains, bathroom brightening | Most tile, cement grout | Silk rugs, untreated metals nearby |
One final pairing is discipline: a quick weekly once-over in splash zones. Two minutes prevents the slow, sticky build that demands heroics. Little and often beats big and brutal. That’s professional thinking, at £2 a brush.
The humble grout brush proves a point: cleaning hinges on contact, not gimmicks. A small, stiff head and smart chemistry revive lines that look beyond help, often in under an hour for an average bathroom. Keep one brush for kitchens, one for baths, and swap as soon as bristles flare; it’s still cheaper than a single boutique cleaner. Seal high-traffic grout, ventilate showers, and your tiles will keep that crisp, just-installed outline. Ready to try the two-quid tactic on your toughest grout lines, and if you do, what room will you tackle first?
Did you like it?4.5/5 (26)